Quantcast
Channel: LinQed
Viewing all 23 articles
Browse latest View live

Create HTML emails from RichText fields with embedded images and attachments

$
0
0

If you want to send formatted (HTML) emails from Domino you have a couple of options.

Starting with version 9, there’s a simple action that allows you to send HTML mail by just configuring some options. You can also use Tony McGuckin’s emailBean snippet to send an HTML mail from an XPage directly, including embedded images and/or attachments. And there’s also the SSJS snippet I wrote to send an email from any backend SSJS script.

Unfortunately, none of these could do what I wanted: send an HTML mail with the contents based on a RichText field (stored as MIME), including any embedded images. With the standard photo upload option available in the XPage embedded CKEditor it’s real easy to add embedded images. Tony’s emailBean snippet came close, but it requires a DominoDocument object as a parameter and thus only works when used directly on the XPage where you create the content. In my case, I either wanted to pick a set of documents to be send or use a scheduled agent to do that.

So I investigated how I could create a DominoDocument from a standard document object.

First stop: this snippet that uses the .wrap() function of the DominoDocument object to wrap a standard document. That worked, but didn’t add the RichText fields to the wrapped document. So I dived deeper and found the JavaDocs for the DominoDocument here. Turns out that there is a getRichTextItem() function that returns a DominoRichTextItem. That object, the DominoRichTextItem, is also used in the emailBean code. The JavaDocs for the DominoRichTextItem describe that you can use a MIMEEntity to create one. The newly created DominoRichTextItem can then be attached to the wrapped DominoDocument.

Here’s the XSnippet I just added to wrap a document, including MIME.

For this to work you need to enable the “Store contents as HTML and MIME” option of the RichText field that you’re storing the HTMl in. When you’ve done that you can use the emailBean to create and send the email:

function sendEmailFromRichText() {
  DominoDocument wrappedDoc = wrapDocument(docMail, "body");

  //now we can pass the wrapped document, including the MIME contents to the EmailBean
  EmailBean emailBean = new  EmailBean();

  emailBean.setSendTo("someone@somewhere.com");
  emailBean.setSubject("Here's a mail");

  emailBean.setDocument(wrappedDoc);
  emailBean.setFieldName("body");

  emailBean.setBannerHTML("<p>Hi, "  + sendTo + "</p>");
  emailBean.setFooterHTML("<p>Kind regards, "  + senderName + "</p>");

  emailBean.setSenderEmail("i@dontexist.com");
  emailBean.setSenderName("Name of the sender");

  emailBean.send();
}

/*
 * Wraps a lotus.domino.Document as a com.ibx.xsp.model.domino.wrapped.DominoDocument, including the RichText item
 * 
 * @param doc document to be wrapped
 * @param richTextItemName name of the rich text item containing the MIME contents that need to be wrapped too
 */
private static DominoDocument wrapDocument( final Document doc, final String richTextItemName ) throws NotesException {
     
  DominoDocument wrappedDoc = null;
       
  Database db = doc.getParentDatabase();
     
  //disable MIME to RichText conversion
  db.getParent().setConvertMIME(false) ;
 
  //wrap the lotus.domino.Document as a lotus.domino.DominoDocument
  //see http://public.dhe.ibm.com/software/dw/lotus/Domino-Designer/JavaDocs/DesignerAPIs/com/ibm/xsp/model/domino/wrapped/DominoDocument.html
  wrappedDoc = DominoDocument.wrap(doc.getParentDatabase().getFilePath(), doc, null, null, false, null, null);
     
  //get the RichText field containing the MIME contents as MIME
  MIMEEntity rtAsMime = doc.getMIMEEntity("mailingBody");
     
  //add the RichText field to the wrapped document
  //see http://public.dhe.ibm.com/software/dw/lotus/Domino-Designer/JavaDocs/DesignerAPIs/com/ibm/xsp/model/domino/wrapped/DominoRichTextItem.html
  DominoRichTextItem drti = new DominoRichTextItem(wrappedDoc, rtAsMime, richTextItemName);
     
  wrappedDoc.setRichTextItem(richTextItemName, drti);
     
  return wrappedDoc;
     
}

Getting HTML from any RichText item

$
0
0

HTML_logoLast week I blogged about sending the contents of a RichText field (including images and attachments) as an HTML mail. Today’s task was related: get the contents of a RichText item as HTML, knowing that the contents can be stored in the item as either MIME or standard RichText.

With the wrapDocument() function I showed you last week you can easily get MIME contents as HTML. It turns out that with some small changes you can use the same method to let Domino convert ‘standard’ RichText into HTML. You probably saw this in action already: create a document with RichText in the Notes client and edit it on the web. What’s new is that this method allows you to do it programmatically.

The trick is in the DominoRichTextItem class: it has two constructors to create it: using either a MIMEEntity or by giving it a RichTextItem. That’s all the info I needed to update my previous function:

/*
 * Wraps a lotus.domino.Document as a com.ibx.xsp.model.domino.wrapped.DominoDocument, including a RichText item
 *
 * @param doc document to be wrapped
 *
 * @param richTextItemName name of the rich text item containing standard RichText or MIME  contents that need to be wrapped
 */
private static DominoDocument wrapDocument(final Document doc, final String richTextItemName) throws NotesException {</code>

  DominoDocument wrappedDoc = null;

  Database db = doc.getParentDatabase();

  //disable MIME to RichText conversion
  db.getParent().setConvertMIME(false);

  //wrap the lotus.domino.Document as a lotus.domino.DominoDocument
  //see http://public.dhe.ibm.com/software/dw/lotus/Domino-Designer/JavaDocs/DesignerAPIs/com/ibm/xsp/model/domino/wrapped/DominoDocument.html
  wrappedDoc = DominoDocument.wrap(doc.getParentDatabase().getFilePath(), doc, null, null, false, null, null);

  //see http://public.dhe.ibm.com/software/dw/lotus/Domino-Designer/JavaDocs/DesignerAPIs/com/ibm/xsp/model/domino/wrapped/DominoRichTextItem.html
  DominoRichTextItem drti = null;

  Item itemRT = doc.getFirstItem(richTextItemName);

  if (null != itemRT) {

    if (itemRT.getType() == Item.RICHTEXT) {

      //create a DominoRichTextItem from the RichTextItem
      RichTextItem rt = (RichTextItem) itemRT;
      drti = new DominoRichTextItem(wrappedDoc, rt);

    } else if (itemRT.getType() == Item.MIME_PART) {

      //create a DominoRichTextItem from the Rich Text item that contains MIME
      MIMEEntity rtAsMime = doc.getMIMEEntity(richTextItemName);
      drti = new DominoRichTextItem(wrappedDoc, rtAsMime, richTextItemName);

    }
  }

  wrappedDoc.setRichTextItem(richTextItemName, drti);

  return wrappedDoc;

}

Using this function you can wrap any document and get the HTML from a RichText item:

View view = db.getView("someview");
Document doc = view.getFirstDocument();

DominoDocument ddoc = wrapDocument(doc, "Body");
DominoRichTextItem drti = ddoc.getRichTextItem("Body");

String html = drti.getHTML();
System.out.println(html);

XPages gotcha: mode=”concat” in your themes

$
0
0

Suppose you have an XPage with a repeat control on it to show a list of documents. In the repeat you generate an <xp:button> for every document. Based on the status of the document you decide to give the button a different color, so you make the styleClass property of the button computed:

<xp:repeat
  id="repeat1"
  rows="30"
  var="entry">

  <xp:this.value><![CDATA[#{javascript:
    print("computing repeat value");
    return ["style1", "style2"];
  }]]></xp:this.value>

    <xp:button
      value="Label"
      id="button">
        <xp:this.styleClass><![CDATA[#{javascript:
          print("computing styleClass:");
          print( typeof entry);
          return entry
        }]]></xp:this.styleClass>
    </xp:button>

</xp:repeat>

That’s (roughly) the code you’d have to write. And guess what: it all works. Everyone’s happy!

Screen Shot 2014-08-28 at 15.35.03So you decide to enhance the looks of your application and include Bootstrap. Bootstrap requires the btn class on all buttons for styling. Being an expert XPage developer you create a theme for your application, add the Bootstrap CSS file and add a control definition to give all buttons that btn class:

<control>
  <name>Button.Command</name>
  <property mode="concat">
     <name>styleClass</name>
    <value>btn</value>
  </property>
</control>

You reload the page, thinking you’re done and guess what: errors!

That’s roughly what I’ve been looking at today and at some point thinking I lost my sanity.

The print() statements in the code above were added by me to show the order of execution. Without the <control> definition in the theme I saw this on the server console:

> computing repeat value
> computing styleClass:
> string
> computing styleClass:
> string

Exactly what I expected! But… after adding the <control> definition I saw this:

> computing styleClass:
> undefined
> computing styleClass:
> undefined
> computing repeat value

Notice the subtle, yet very important, difference in the order of computing: with the <control> definition the styleClass is computed before (!) the repeat value, making it impossible to let the button style depend on the repeat value. This behaviour is caused by the mode=”concat” part, that should combine the value of the styleClass with the one set in the theme.

The Bootstrap4XPages plugin has that same <control> definition in it, so if you’re using that you will likely run into this some day.

The solution I came up with for now is to add a new <control> definition to the theme, setting it to override any inherited settings and setting the mode to the default (‘override’). Set the themeId to the new <control> name and it all works again:

<control>
  <name>Button.NoConcat</name>
  <property>
  <name>styleClass</name>
    <value>btn</value>
  </property>
</control>

and:

<xp:button value="Label" themeId="Button.NoConcat"></xp:button>

I have no idea why it behaves this way and would have never guessed that a <control> breaks anything but the UI in my app. If anyone can share some light on this: please do!

Escaping the yellow bubble at ICON UK

$
0
0

IMAG1819
Last Friday I was in Londen for what was yet again an excellent ICON UK. Tim Clark really did a great job in organising it and I hope he can now relax again. Kudos also to Tony Holder for organising the speaker dinner at Wilton’s. Didn’t know you can eat that well in the UK!

The venue (IBM Client Centre) added a nice touch to the conference and was conveniently located at the center of Londen. That allowed me to try out a Boris Bike and see what cycling on the left side of the road is like. Straight sections didn’t cause me any problems, but sweat ran down my back at every crossing. I’m glad I’m still alive to write this. But hey: no guts, no glory!

I was once again allowed to host a session and decided this time to NOT do it about XPages or any other IBM technology, but share my experiences with an alternative web development stack called MEAN (that’s MongoDb, Express, AngularJS and Node). Thanks to anyone who was in the room for attending. For all of you who weren’t, here’s the deck:

Deploying angular-seed to Heroku

$
0
0

heroku-LogoAngular-seed is an application skeleton for AngularJS apps. It helps you to quickly bootstrap new applications. I’m currently using it for an app I’m writing and wanted to deploy that to Heroku for testing. Since that wasn’t a very straightforward process, I thought I’d share my experiences here.

If you’re reading this, you’ve probably already cloned the repo from https://github.com/angular/angular-seed and wrote the app. Of course you can also just deploy the sample app that comes with angular-seed, but you’ll need to make a couple of changes to prepare it for Heroku.

bower-logoBower

Angular-seed uses bower (check package.json: it’s already listed there as a devDependency), but in order for Heroku to use it, we’ll need to add it to the dependencies section too:

npm install bower --save

We also need to update the path to bower in package.json:

"postinstall" : "./node_modules/bower/bin/bower install",

Express as a web server

Angular-seed uses http-server as the web server to test your changes, but I didn’t find a way to use that on Heroku. Instead, I just add a simple Express based static files server.

First we’ll add Express as a node module:

npm install express --save

Next create a new file in the root of your project named app.js to serve static files from angular-seed’s app folder:

var express = require('express');
var app = express();
app.use(express.static(__dirname + '/app'));
app.listen(process.env.PORT || 3000);

Define a Procfile

We need to tell Heroku what it needs to do to start your app: create a file named Procfile in the root of your project and add:

web: node app.js

This tells Heroku to launch node using the app.js file.

Heroku

We’re ready to push our app to Heroku. Log in to Heroku and create an app. Install the Heroku toolbelt on your computer so we can call heroku commands from the command line.

To send your project to Heroku, we’ll need to add Heroku as a git remote

heroku git:remote -a <your_app_name>

Next, commit all the changes we’ve made in the local project and send your project to Heroku:

git add .
git commit
git push -u heroku master

In the terminal you’ll see your app being deployed, compiled and started on Heroku. You can now view it using the shortcut command ‘heroku open‘.

Screen Shot 2014-10-07 at 15.55.53

There are probably different ways to do this, but this method worked for me. Please let me know if this worked for you too or if you would do it different!

Bootstrap in XPages: now part of the Extension Library

$
0
0

bootstrap-logoToday IBM released a new version of the Extension Library (901v00_10 to be exact). The biggest news being that Bootstrap is now an official part of that plugin. They essentially took the Bootstrap4XPages plugin that Phil Riand and I have been working on and integrated it in the project. It’s great to see that IBM fully embraces Bootstrap to make XPages responsive (and good looking) and too see how a community driven project becomes part of the core product.

I already had a play with the new version and must say that Brian Gleeson and the rest of the team did an excellent job in extending the support of Bootstrap in the core controls: an area that could definitely need some work. They also improved the wizard to create a new application layout.

Unfortunately some parts of the plugin didn’t make it to the Extension Library, like the embedded Select2 support. I hope they’ll be able to add that again (and/or other useful Bootstrap plugins) in a future release.

If you want to see the new plugin in action: just visit Bootstrap4XPages.com. Good to know: the Select2 demos on that site are still powered by the Bootstrap4XPages plugin showing that that plugin can happily coexist with the Extension Library on the same server!

Domino Access Services: ‘Limit Exceeded’ error for view entry collections

$
0
0

If you’re using Domino Access Services to get a view entry collection and include the count=XXX parameter (like described here), you’ll get an error if the number is larger than 100:

Limit exceeded.  Cannot read more than 1500 entries.

According to this, this limit was introduced with the 901v00_10 version of the Extension Library. I just ran into that limit myself and decided to do some digging in the ExtLib source. In one of the source files I found that the maximum can actually be controlled by a notes.ini parameter called DataServiceMaxViewEntries.

I just set that on my server and it works like a charm!

(not sure if this is a supported parameter, or if it will remain in the ExtLib, so you’re on your own with this…)


Fun with Domino, AngularJS and CORS (not really)

$
0
0

For a mobile app I’m currently working on (more on that soon) I’m using Domino Access Services. After fixing the issue with the number of entries returned by a view entry service, I quickly ran into other issues.

I’m using a frontend build with Angular that’s running on a different domain name. So I have to add CORS headers (Cross Origin Resource Sharing). That’s easy: create a response document for the Internet Site in the Domino Directory and add an Access-Control-Allow-Origin header with a value of *. That worked Ok. For GET requests.

If you try to make a POST request, the default CORS behavior is to do a so called preflight request (before it sends the POST) in which the browser asks the target server what options it supports. It does this by sending an OPTIONS request. And that failed.

I first checked in the internet site if the OPTIONS method is allowed at all (tab ‘Configuration’ -> ‘Allowed methods’). It was, but I got an error that the Access-Control-Allow-Origin header wasn’t present, so I wasn’t allowed to make the request. That should have been taken care of by the website rule I created. Luckily I found a comment from Mark Barton here: turns out that the HTTP response code for OPTION calls is 204. If you think hard you might remember that you need to set response codes in the web site rule. In mine that only had 200 (Ok) and 206 (Partial Content) in it. I added 204 and… the OPTION request came through. I then ran into the next issue.

According to this the Content-Type request header is required for a POST request and needs to be set to ‘application/json‘. If you want to do that cross domain, the target server needs to allow you to set it. So I had to add another CORS header to the internet site: Access-Control-Allow-Headers: Content-Type.

All set now? Almost… When a new document is created, it responds with a 201 response code so I needed to add that to the internet site rule too.

And finally (for this part): the 201 response is sent without any content: it returns a response header named ‘Location’ that contains the location of the newly created document. Its value looks like this: http:///.nsf/api/data/documents/unid/.

To be able to read that I needed to add an argument to my success callback function (‘headers’) and use a call to headers(‘Location’) to read that header. Correct, but… remember that we’re working on different domains? By default response headers aren’t exposed to the originating domain, so here goes another response header in the web site rule: Access-Control-Expose-Headers: Location.

Can’t wait to see what CORS issues I’ll run into next (and I’m running out of web site rule response headers :-( – wonder if there’s a hack for that without installing a proxy and keep using the standard DAS).

This is what my website rule now looks like:

cors


Marky & Mark’s ‘mobile first’ ConnectED Sessions demo app

$
0
0

In about two weeks time IBM’s ConnectED takes off. We (that’s me and Marky Roden) were fortunate enough to be allowed to speak there with a brand new session titled “The Future of Web Development – Write Once, Run Everywhere with AngularJS and Domino”.

Screenshot 2015-01-14 10.12.56
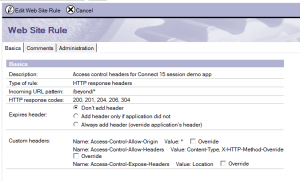
And of course there’s gonna be demos. Lots of them. But we wanted to make them useful too. So we decided to create a ‘mobile first’ Sessions demo app. Check it out at

and be convinced to come to our session!

A little about the app: it was built using AngularJS as the MVC framework. It uses Bootstrap for the UI (with the Bootswatch United theme to be exact). The data comes from a Domino database that’s exposed using the standard REST API from Domino Access Services. The session data comes from the Totally Unofficial Totally Unsupported IBM ConnectED Session Database by Mat Newman and others. Huge thanks to them for putting this together again!

Oh and if we haven’t convinced you to come to the session, listen to this:

File uploads to Domino servlets (with an Angular demo)

$
0
0

(Updated: add required java security policy changes)

For one of my customers I’ve started working on an application that uses AngularJS for the frontend that talks to a REST API served by IBM Domino. For the REST API we decided use servlets: something that’s covered in great detail on Ed McCormick’s excellent blog. If you haven’t used servlets in a Domino database yet, go read some of his posts on this topic. Make sure you also take a look at the demo application he created containing examples of using servlets for a REST API.

One of the functions in the app (and probably in almost every app you’re going to work on too) is uploading files. Since I couldn’t find any info on how to do that with a servlet running on Domino, I decided to figure it out myself.

In case you’re only here for the code: download the demo app here. The GitHub repo is here.

Screenshot 2015-06-24 10.45.23

The demo shows how you upload files to the servlet and store it in documents in the NSF. I added a simple Angular front end that uses the angular-file-upload plugin to handle the uploads (MIT licensed). Out of the box that gives you multiple file select, image previews, progress bars and drag-and-drop. The code for the upload servlet can be found in the UploadServlet class in the database. Included in the demo database is also a very simple form showing that you can also use a

<input multiple="multiple" type="file" />

to upload multiple files in a single request. Something that (AFAIK) can’t be done on Domino if you’re going the XPages route.

My first attempt at the servlet was to use the same code I wrote a while age to process file uploads to an XAgent. That didn’t really work, because XAgents go through the XPages runtime and that does some pre-processing for you. In a servlet context you don’t get that: you have to work with the unmodified HttpServletRequest object. So I looked to see how the rest of the Java world was handling file uploads with servlets and discovered the Apache FileUpload project. That package abstracts the complexity of dealing with multipart/form-data. In a servlet context it gives you easy access to the uploaded files. So I added the required JARs to my database, read the docs and copied some sample code to get a handle on the uploaded file:

// Create a factory for disk-based file items
DiskFileItemFactory factory = new DiskFileItemFactory();
// Configure a repository (to ensure a secure temp location is used)
ServletContext servletContext = this.getServletConfig().getServletContext();
File repository = (File) servletContext.getAttribute("javax.servlet.context.tempdir");
factory.setRepository(repository);

// Create a new file upload handler
ServletFileUpload upload = new ServletFileUpload(factory);

// Parse the request
List items = upload.parseRequest(request);

The items List in the code above contains all the items in the incoming request: note that every item can be either a form field or a file. You can differentiate between the two by using the isFormField() method.

Since I didn’t copy the required imports in the Java class, I ended up with some error messages about classes that couldn’t be resolved. Clicking on the errors revealed something interesting: I could solve the error by importing the Apache packages from org.apache.commons.fileupload (from the JARs that I just added to the database), but the list also showed a second option: use the com.ibm.xsp.http.fileupload package. Apparently Domino uses the same code under the hood to process uploads. That’s good stuff and means you don’t have to import any JARs to get the upload code to work :-)


Screen Shot 2015-06-22 at 14.06.48


The rest of the code in the UploadServlet class in the demo database speaks for itself: I get the uploaded file(s) using the Apache FileUpload class and store all files received (in a single POST request) in the same document. Since the angular-file-upload plugin sends a request to the server for every file, they all end up in separate documents. Of course you can change this behavior by adding some logic to store them all in the same document, but I’ll leave that up to you.

One thing to note: the code in the demo database requires access to the getClassLoader method in Java, so you have to allow that in your Java security policy. Best practice on a Domino server is to create a file called java.pol in the <domino install>/jvm/lib/security/ folder and add:

grant {
permission java.lang.RuntimePermission "getClassLoader";
};

It was already in my settings, because a lot of other libraries need this too.

Enjoy!


Quick tip: updating URL hashes in XPages

$
0
0

I’m a big fan of the ExtLib Dynamic Content control. Use it in probably all my single-page XPage apps. Recently I was working on a page that had 2 nested Dynamic Content controls. I wanted to allow users to bookmark the page, including the state of both controls. I wanted to use a URL hash to do that. The useHash option apparently only supports one level, so I had to write a solution involving some client side JavaScript to update the URL hash. Here’s what I used to access the URL hash and update it:

//get the current hash value as a JavaScript object
var hash = dojo.queryToObject( dojo.hash() );

//add a parameter
hash['newParam'] = newValue;

//update the hash
dojo.hash( dojo.objectToQuery(hash) );

Dropzone.js in XPages: it doesn’t get easier than this

$
0
0

After reading this question on StackOverflow by Daniele Grillo I decided to have a quick shot myself at integrating dropzone.js with XPages. Daniele already gave the solution to his issue himself (no bonus points for me today), but maybe others can benefit from a full example.

Source | Database

dropzone-logo

Dropzone.js is a JavaScript library that allows you to easily add a drop area to your web page where users can drop files. Files dropped there are automatically uploaded to the server. Integration is really simple: add the Dropzone JS file to your XPage (I’ve also included a Dropzone sample CSS file from their demo page for some styling), create an XPage and accompanying Java class to handle the uploaded files (see here), and write some JavaScript to enable and configure the dropzone:

<xp:scriptBlock id="scriptBlock1">
<xp:this.value><![CDATA[
Dropzone.autoDiscover = false;

var myDropzone = new Dropzone(".dropzone", {
url: "uploadHandler.xsp",
paramName: "uploadedFile", //used to transfer the file
clickable:true,
uploadMultiple:false,
maxFilesize: 2
});
]]></xp:this.value>
</xp:scriptBlock>

It doesn’t get easier than this!

Tracking your XPages app’s usage with Google Analytics

$
0
0

google-analytics-logoOne of the latest requirements from one of my customers was to be able to track the usage of their application. My first though was (obviously): let’s use Google Analytics for that.

The application is almost completely built as a Single Page Application (SPA) using one of my favorite ExtLib components: Dynamic Content. That means that for every change in content, only a part of the page is updated. That also means that the URL of the page is never updated. Those two things are important to remember.

Including Google Analytics in an application is simple: just include the script block that you can get after setting up an Analytics account. It looks similar to this:

<!-- Google Analytics -->
<script>
(function(i,s,o,g,r,a,m){i['GoogleAnalyticsObject']=r;i[r]=i[r]||function(){
(i[r].q=i[r].q||[]).push(arguments)},i[r].l=1*new Date();a=s.createElement(o),
m=s.getElementsByTagName(o)[0];a.async=1;a.src=g;m.parentNode.insertBefore(a,m)
})(window,document,'script','//www.google-analytics.com/analytics.js','ga');
ga('create', 'UA-XXXXX-Y', 'auto');
ga('send', 'pageview');
</script>
<!-- End Google Analytics -->

This script is standard, except for the line that says ga(‘create’, ‘UA-XXXXX-Y’, ‘auto’); In that line a unique identifier is set that identifies your own Google Analytics property.

When you change the content (facet) of a Dynamic Content component, it also automatically executes any JavaScript blocks that are part of the new content. That happens every time the content is shown again. Very convenient. So I just had to add the script block to all the content that I’m showing and wanted to track.

Now we’re left with only one problem. The Google Analytics script will automatically include the current URL and page title when registering a page view. But since the URL of the SPA is never updated, Google Analytics cannot register requests for different content. Luckily Analytics offers some additional features for Single Page Applications. By making an extra call to the ga() function (before the ga(‘send’, ‘pageview’) call is made) you can set (or fake) the current page’s URL and title:

ga('create', 'UA-XXXXX-Y', 'auto');
ga('set', { page : '/9F2', title : 'Title that identifies the dynamic content'});
ga('send', 'pageview');

The ‘page’ property identifies the ‘URL’. It doesn’t have to be a real URL, just use something unique that’s the same every time that specific dynamic content section is shown. The application features (amongst other things) a CMS where I’ve created documents for every unique page. I computed the ‘page’ property to be the document’s NoteID and the ‘title’ as the subject of the content.

Visual Studio Code, SourceTree and terminal/ command line integration

$
0
0

downloadOver the past couple of weeks, Visual Studio Code has become my favorite editor. It has some great features, is fast and relatively easy to use. Of course I’m still learning how to use it most effectively. Here’s what I learned today.

Starting Visual Studio Code from the terminal

Visual Studio Code has a built-in function to add a shortcut to it in your OS X environment. That allows you to start it from a terminal. The procedure is described here and comes down to:

  • Open Visual Studio Code
  • Bring up the Command Palette ( Cmd – Ctrl – P ) and type “shell command”
  • Execute the ‘Shell Command: Install ‘code’ command in PATH’ command

When you’ve done that, you can simply type ‘code‘ in your terminal to start Visual Studio Code. If you want to open a specific file with Code, type ‘code <filename>’.

Note: Windows users get this feature automatically when installing Code.

Open a file directly from a repo in SourceTree

SourceTree has a function that allows you to define ‘Custom Actions’ that can be started from files in any repo. If you’ve added the ‘code’ command from the previous step, you can create a Custom Action to open any selected file with Visual Studio Code:

  • Bring up the SourceTree preferences (Cmd + comma)
  • Go to the Custom Actions tab and configure it like this (OS X users):

Screenshot 2016-04-21 10.03.58

Note that Windows users need to configure the custom action with the full path to the Code executable:

Capture

If you now select a file in your repo, you can right click > Custom Actions > Edit in Visual Studio Code to immediately open a file with Code.

Happy coding!

Getting the IBM Connections API to play nice with Postman/ Chrome

$
0
0

postmanI was doing some work with an Angular application talking to the IBM Connections API. More specifically: I wanted to show and create activities based on some user input.

The Connections API is pretty complex, so I normally run some ‘manual’ tests first based on the documentation, and then use those result to write the code to call the API. My preferred application for that is Postman.

While running the tests in Postman I ran into a big issue. All GET and PUT requests came through fine, but I wasn’t able to create anything using a POST request to the API: every request I made returned a 403 error:

<error xmlns="http://www.ibm.com/xmlns/prod/sn">
<code>403</code>
<message>You are not authorized to perform the requested action.</message>
<trace></trace>
</error>

The funny thing was that using the same credentials, I could create items using the web interface just fine. My first thought was that it must be some strange access control setting hidden away deep in a config file (“don’t allow users to create stuff using the API”), but then I found someone with a similar issue on StackOverflow. And I found this IBM Technote. So, apparently there’s something fishy going on with Postman.

So by enabling the Chrome Developer tools for Postman, I was able to look at the exact HTTP request that Postman sends. And I found the Origin header that was already mentioned in the StackOverflow post:

Origin: chrome-extension://fhbjgbiflinjbdggehcddcbncdddomop

Turns out that IBM Connections doesn’t really like that. That’s by design and has something to do with cross-site request forgery.. Using a curl command I could easily bypass the header and confirm that it was indeed the cause of my problem.

So the only thing left (since I like testing with Postman), was to figure out how to change that Origin header. The header is one of the ‘restricted’ headers that is automatically added by the browser (Chrome) and can’t be easily changed. Luckily, the people at Postman also thought of that and created the “Postman Interceptor“: a Chrome extension that sits as a sort of proxy between your Postman requests. After enabling that in Postman I was able to change the Origin header of my requests. I set it to the hostname of the IBM Connections server and voila: happy times!


Convenience at a cost: comparing Domino Java APIs performance (standard, ODA, JNA)

$
0
0

I’m into performance at the moment, trying to solve some nasty issues in one of the applications I work on. While researching the topic I came across Karsten Lehmann’s Domino JNA project that allows you to use some low-level C-API methods using Java. It contains functions that are very useful in my scenario, but I also wondered how the library performed. So I wrote some basic tests, comparing JNA with the ‘standard’ (or ‘legacy’) Domino API and, while I was at it, the org.openntf.domino (ODA) API.

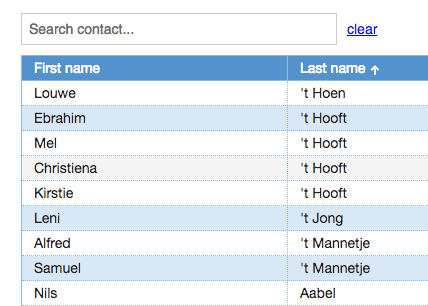
So I wrote a couple of tests using the 3 APIs that traverse a view from the well known ‘Fakenames’ database. It is based on the Domino Name & Address book template and contains 40,000 documents. The tests will loop through a view called ‘People’ containing all the documents and will read a value from one of the columns.

At this point I will be taking bets:

Note: There is a poll embedded within this post, please visit the site to participate in this post's poll.

Time to see for yourself! I created a simple application that allows you to test the different methods and view the results (latest 10 are shown only): take a look here.

The source code of the application and test code can be found here. The environment: CentOS 6 (64 bit), SSD, 1GB RAM, Domino 901FP5 (64 bit), ExtLib 17, ODA 3.2.1, JNA 0.9.5. Please let me know if I made any errors in the tests.

I don’t know what about you, but the results surprised me! I didn’t expect the overhead of the non-standard APIs to be that big. In every day use I guess this won’t affect your applications a lot, but it’s something you definitely have to be aware of if you needs to squeeze just a bit more performance out of your application.

UPDATE

– Upgraded the JNA project to 0.9.5
– Based on Andy Cunliffe’s comment I’ve added a new test using a ‘manual’ Java loop in the ODA:

ViewEntry ve = nav.getFirst();
while (null != ve) {

// code here

ve = nav.getNext();
}

That code seems to run about 30% faster that a standard Java loop in ODA:

for (ViewEntry ve : nav) {

// code here

}

Time for a new Notes/ Domino support model

$
0
0

I’m pretty happy with FP10: great that with we now have up-to-date Eclipse/ Java/ OSGi version. Despite some obvious glitches it works reasonably well for me. But if you read the blogs and follow Twitter: a lot of people are having issues. The current ‘gold’ version would have been a great beta (2) and with a couple of fixes a great release.

I can confirm that I also have most of the issues described in this blog post (and more). I also can/ really want to elaborate on them by providing more info/ screenshots just to make FP10 better.

​But… although I appreciate IBM (ArnazR) asking for more info in one of the more recent comments I don’t think that is the place. I also support software and absolutely hate it when people introduces new issues in a comments section.

​Creating PMR’s is way too much overhead. It is mentioned that a PMR exists for most issues. Can I simply add more info with just a line of text? Add a screenshot in under a minute? I don’t think so. Since I’m a consultant/ business partner and not a customer, I can’t even create PMR’s (seriously?). Don’t want to bother one of my customers for it neither.

Wouldn’t it be great if we had a simple way to log the issue we’re having with FP10? Just have a look at the Github issues section for inspiration. ​The delivery model for Notes/ Domino has changed in light of what the rest of the world is doing. I think it’s time the support model follows.

PS. For ArnazR: have a look at the screenshot. I would also say that this help screen looks ‘curious’).

Query Domino data and faceted search with Domino JNA (part 1): setup, sorting and pagination

$
0
0

Every web application I build includes lists (or as Domino people like to call them: views) in one form of another. And then users start asking question like “But can it do sorting?” “How about a search function (on just these fields?)” “And filtering?”. With <insert-you-favorite-framework-here> that’s not too hard on short lists. I’m an Angular guy and can easily give them sorting and filtering.
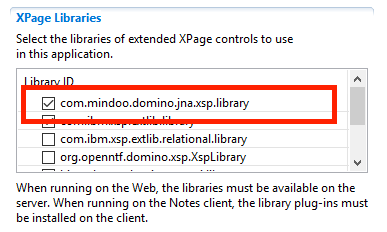
But then the data grows. And you need to find a solution for paging. Or build an infinite scroll. So the fun starts: how do I get paged/ sorted/ filtered data from my Domino database? My favorite goto place for this always used to be the XPages REST controls. But they have limitations. Luckily I recently discovered an alternative: the Domino JNA project by Karsten Lehmann.

In short: it gives you an API you can use to access Domino data in ways you never did before. It does that by surfacing low-level Domino APIs that you normally don’t have access to. You’ll be amazed at all the gems hidden away in the product. One of the things I particularly like about the Domino JNA API is being able to work with Domino view data, perform JOIN-like queries  (yes, you read that right), and use the built-in sorting and pagination functions. That allowed me to build a faceted search. How I did that is the topic of this series of articles.

Note: the demos for this post are created using XPages as the front end. Everything that I write here will also benefit you when you’re creating a REST API on Domino. I might even do a follow-up article describing that.

In this first post I cover the basics: installing the plugin, setup a structure to read view data and create a first basic example of showing a sorted list of entries (from a view) using JNA.

Installation of JNA

Download the latest version of Domino JNA from the Github repo. Domino JNA is delivered as an OSGi plugin and needs to be installed on both the server and client. Restart the server and client and you’re good to go.

In the application properties of the database you want to use Domino JNA in, you need to enable it on the Page Generation tab:

Fake data database with 50,000 contacts

For testing I created a database with 50.000 contacts. The fake contacts were created by the Fake Name Generator and imported into an NSF that can be downloaded here. The NSF just contains the data and a view.

A basic list with pagination

Lets start with the basics: accessing a view and show the entries in a list. The demo can be viewed here (source code on Github) and consists of an XPage with a data table and a Java (controller) class to drive the backend. In the controller class you’ll find this:


Let’s walk through the code.

Opening a view (in JNA called a ‘collection’) is done similar as with the standard API: open the database and then the view/collection (lines 4 and 5).

Once you have the collection, you start to read entries from it. That’s done a little different then what you’re used to. You start of by specifying how to ‘walk’ the view entries. The simplest form is just move from one entry to the next using Navigate.NEXT (line 11). JNA also offers alternatives like moving to the next category or next ‘unread’ entry. More on that in another post.

Normally you retrieve a ViewEntry from a view (or view navigator) that includes all column data as well as metadata like the Note ID. You can’t control what data to read or ignore.  With JNA you can specify exactly what data to retrieve for every column. That allows you to code for performance: if you don’t need the column data, you just don’t read it. In the controller class in line 15 you can see that I’m reading the Note ID and all column values (ReadMask.SUMMARYVALUES) for each entry.

The API call on lines 21 to 24 is where the entries are actually read from the view. The skipEntries parameter allows me to start reading from a certain location in the view (useful for pagination or an infinite scrolling list) and with the NUM_PER_PAGE paramater I’m telling the API the number of entries to read in one request. The final parameter is the callback function that specifies what to do with every entry (a NotesViewEntryData object) retrieved from the view. In the example I’m using the built-in EntriesAsListCallback that returns a Java list containing the entries from the view. You can also write you own callback function to convert every entry in (for example) your own Java models.

Since I’m using XPages for the demo, I need the controller class to be serializable. The list of NotesViewEntryData object isn’t serializable, so in the last lines I’m converting the 15 entries read from the view to a list of Java maps, containing only the primitive values from the columns.

Pagination

If you look at the full code of the ListController class, you’ll see that I’m keeping track of a ‘skipEntries‘ variable. If a user navigates to the next page of data, I update this variable (incrementing it by the number of entries per page) and by adding that variable to the getAllEntries() method call I start reading at the new index. That, combined with the number of entries shown on every page allow me to add a pager.

Sorting

To enable sorting on the dataset, you need to make a change to the view design. For every column that should be sortable you enable the option “Click on column header to sort”. With that in place you can change the sort order of the view data with this API call:

Combine that with a click handler on the view columns and two variables in the controller class to store the current sort order and direction and this is what you get.

Finally

This article describes how you can start using Domino JNA to work view Domino view data. In the next article I’ll show you how you can use the built-in entry selection methods to filter the data (based on search results in the current or a different view), while maintaining the sort order and pagination functions.

Query Domino data and faceted search with Domino JNA (part 2): filtering

$
0
0

In the first post in this serie I covered the basics on how to create a list of Domino view data with pagination and sorting using the Domino JNA project. We can now get into the more interesting stuff: filtering the dataset.

Background on filtering with Domino JNA

Before diving into the code, it might be good te offer some background. Like I mentioned in the first post, Domino JNA surfaces some low level Domino (C) APIs. With those APIs it is possible to apply a selection/ filter on a view. Think of it as opening a view in the Notes client, and selecting a number of documents according to some selection criteria. The nice part about this is that it is really fast and is able to keep the sort order of the view, as well as doing pagination.

A selection is applied to a view by giving it a list of Note IDs:

Set<Integer> selectionList = new HashSet<Integer>();
collection.select(selectionList, true);

How you retrieve the list of Note IDs of documents that you want to select/ filter, is up to you: if a user wants to search for a specific last name, you can perform a view lookup to get a list of all the entries that match that name. But you can also get results from another view. Or, if you linked documents together using some ID, from related documents (e.g. performing JOIN-like queries).

Optimised lookups

To perform fast view lookups, JNA offers an optimised lookup function that performs better than the standard methods. Instead of using:

view.getColumnValues(colIndex);

You use:

collection.getColumnValues(colName, locale);

I used this optimised lookup function on the contacts list in the demo database to get a unique list of all cities and found the Domino JNA method to be about 7 times faster!

Note IDs as Integers, not Strings

When working with Domino JNA you’ll notice that it uses Integers to represent Note IDs in a database. This is done for efficiency reasons. Converting a Note ID from a String to an Integer can be done with a single line of code:

Integer id = Integer.parseInt(noteId, 16);

Filtering the contacts by cities

The demo application uses a list of 50,000 contacts. Every contact lives in a city, so let’s start with a filter on that. You could of course query the contacts by adding a Full Text index and using that, but I always run into issues. For example it isn’t really good at doing exact matches: if I only want people in city “X”, I don’t want them from “XY” (or “X Y”). Keeping the FT index up to date is also a challenge (BTW: looking forward to the changes in this area in Domino v10!).

For the cities filter I added to the third demo I used a Select2 item picker and populated that with all the available cities by performing a fast view lookup in the view (see the code below, rows 9-27). On my local VM it takes about 900 ms (for about 8,000 unique cities in the 50,000 contacts). The resulting list is cached in the applicationScope. Note that for the demo I populate the Select2 picker with a subset of all the available cities: 8,000 entries would really slow it down in the UI. In a real application you would use a server side lookup.

When the filter is applied, the list is reduced to those contacts that match the city/ cities: for every city selected in the filter, a lookup is performed to get the matching Note IDs (rows 95-99). Reading the entries that should be displayed on the current page is done in the loadEntries() function. It checks if there’s a filter applied (row 49), and if there is, it applies the list of matching Note IDs to the collection. It then iterates over the matching entries only (rows 54-56).

Adding more filters

Using this method, we can add more filters and combine the results. In demo 4 and demo 5 I added an extra filter on country (similar to the city filter) and on last name. Note that the demos do an “OR” lookup with all filters: if you select a city and country, the resulting list shows the results for the city as well as the country. The can easily be changed in the controller class by intersecting the lists of matching IDs.

The last name filter is a bit different: instead of doing a view entries/ column lookup to get an exact match, I do a lookup on a column that contains all last names and Note IDs. That list is cached in the applicationScope and used to find (partial) matches. The design of the ‘contacts’ view I used is available in the demo database.

The last en best demo (demo 6) shows how you can make filtering the list more user friendly/ intuitive: it updates the results after each change of one of the filters.

The source code for all demos is available on Github.

Finally

With just a few days ahead until Domino V10 is released, one of the first things that comes to my mind is: how does this all stack up against the new Domino Query Language. I guess that has to be the topic of a follow up post…

Query Domino data with Domino JNA (part 3): REST API and infinite scroll

$
0
0

With the demos from part 1 and part 2 we now have a list running in XPages that has sorting, paging and filtering. But what if you want to use Domino JNA in a REST API? To serve a JavaScript/ Angular/ React/ Vue application or, why not, an app running in Office 365?

The good news is that we already have most of the code for that. So we can take the code from demo 6, do a little refactoring, write a class for the REST API, and we’re done! In this post I’ll show you how to create the JNA-powered REST API and use it in a JavaScript grid component (for Domino people: a ‘view’) called AG Grid. Want to see the demo first?

REST API in Domino

The main reason why we need to refactor the controller class from demo 6. is that REST APIs are stateless, so we need to get rid of all Java class variables. We end up with one (public static) getEntries() method and add parameters to set the start index, number of entries to return, sort order and filter.

Creating a REST API in Domino can be done in multiple ways:

For the purpose of this demo, and to keep things simple, I’ve used the ExtLib REST control. In short: you  create an XPage (e.g. api.xsp), add the ExtLib control, set the path (the part in the URL after the XPage name, e.g. ‘contacts’), configure it as a custom REST service and point it to a Java class (eu.linqed.api.ContactsService). In that class you extend com.ibm.xsp.extlib.component.rest.CustomServiceBean and implement the doService() method to handle the request. See the demo database for an example. With that in place, we now have a working REST API serving the contacts data. The data can be sorted, paged and filtered by combining URL parameters (start, count, sortCol, sortAsc and filter).

Using the REST API in an app

For this post I created a small JavaScript demo app that uses ag-grid to show the contacts. ag-grid is a very feature-rich, open source component to build grids (sorry if that sounded like marketing – I’m not affiliated in any way with them). It comes with built-in support for sorting, filtering and infinite scrolling using a virtual row model. Plus it has versions for all the major JavaScript frameworks. Since I’m the most comfortable writing Angular I used that one.

After following the getting started tutorial I ended up with a working grid, linked to their sample data. We’re now ready to change that and link it to the Domino JNA-driven REST API we just created. The documentation describes what events we can use.

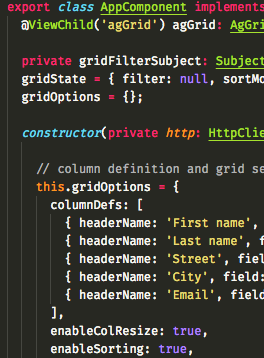
Most changes need to be made in the app.component.ts file: the component definition and configuration for the grid. We’ll first change the endpoint and immediately run into an error: the Angular app is running on a different server, so the browser shows a CORS security warning. You can fix that by (1) adding an Access-Control-Allow-Origin header to your servers’ response or (2) simply run the Angular on your Domino server. When you’re running Domino behind a proxy you can add it to the proxy configuration. Or you (normally) would create rule for your website document in names.nsf. Unfortunately those rules don’t seem to be added when you’re using an ExtLib REST Control, so you either need to use a proxy (=recommended) or add the header to the ContactsService class.

We then have the change the column definition to display properties from the contacts received from the REST API in the ‘columnDefs’ property of AG Grid (lines 25-30).

Infinite scrolling on the grid is enabled by setting the ‘infinite’ row model, according to this guide. The datasource can be found in rows 102-156. The basic idea is that when the user (almost) scrolled to the end of the list, it sends a request to the REST API to load more data. With that request it includes the current ‘state’ of the grid (sort column, filtering). You can see the request being made on line 135. Note that I’m connecting to the endpoint configured in the ‘environments’ configuration file.

Last thing is to handle a user entering something in the search field or sorting the grid. We change the ‘state’ object of the grid in the appropriate events (onGridSortChanged, onGridFilterChanged) and the grid takes care of the rest!

Have fun with the demo and don’t forget the explore the source code of the demo database and Angular demo app.


Viewing all 23 articles
Browse latest View live